Use these short workflows to develop a proposal, distinguish existing provision from changes, and make decisions traceable.
One linked module identityPreserved versionsProgramme permissions
01
Understand the board
Open a board from Your workspace. Check its name and the current scenario.
Choose Current, Proposed or Changes. Current is the original reference.
Use Visible programmes and tracks to show only the columns you need. Visibility is saved for your account and does not change teaching totals.
Choose Detailed cards for editing or Compact cards for an overview. Use the bottom year buttons to centre a year.
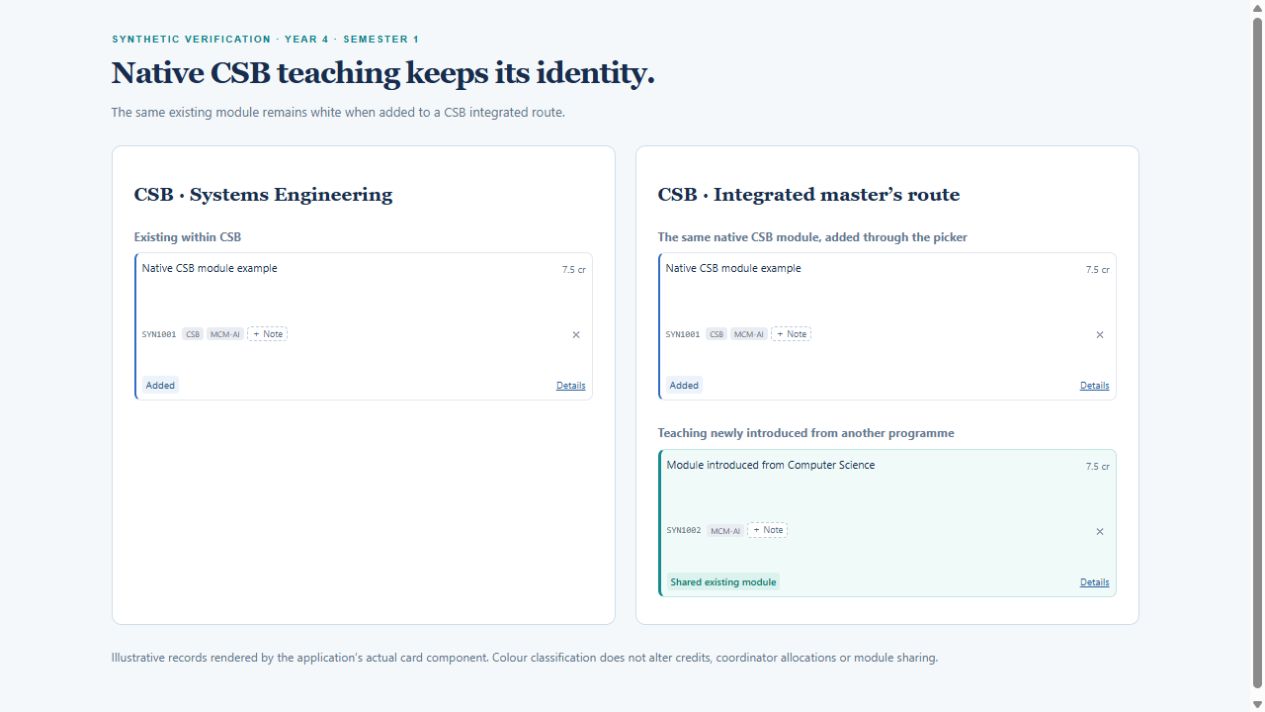
WhiteExisting provision within the receiving programme, including its integrated routes.
Green / tealExisting teaching newly introduced from another programme.
Solid red borderA new module requiring development.
Dashed red borderExisting teaching from another DCU school, proposed for reuse.
Dashed black borderA master’s module. INT identifies earlier integrated MSc teaching.
Programme badges describe shared teaching. They do not, by themselves, make a native CSB module a new import. Purple shared-group containers describe linked structure separately.
The application’s card renderer, using illustrative records, shows the distinction.02
Add an existing or new module
In the required year, semester and track, select +.
Search by title, code or programme. The picker prioritises modules taught in the same year and semester. Enable Show matching credits only if useful.
Select existing modules, then Add selected. Reusing an existing delivery reuses its teaching allocation.
If the module is genuinely new, choose + New module, then New module to develop. Enter its code, title and credits; mark master’s status when appropriate.
Use the catalogue picker for a module that already exists. Creating another catalogue entry with a different identifier would break its linked identity.
To remove a card, use ×. Mark deleted keeps its position visible; Remove from view hides it. Earlier saved versions remain available.
03
Reuse a module from another DCU school
Select +, then + New module.
Set Module type to Existing module from another DCU school.
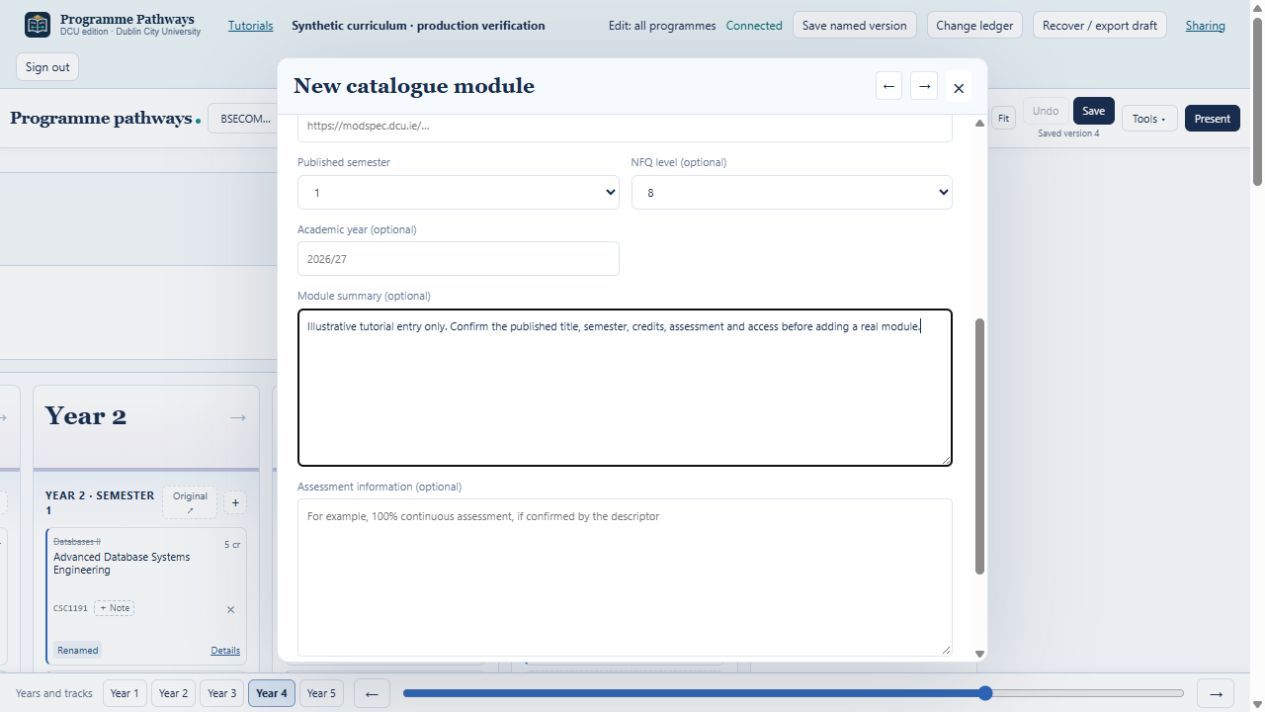
Enter the published code, title and credits. Add the supplying school and, where available, the official DCU module link, semester, NFQ level, academic year, summary and assessment information.
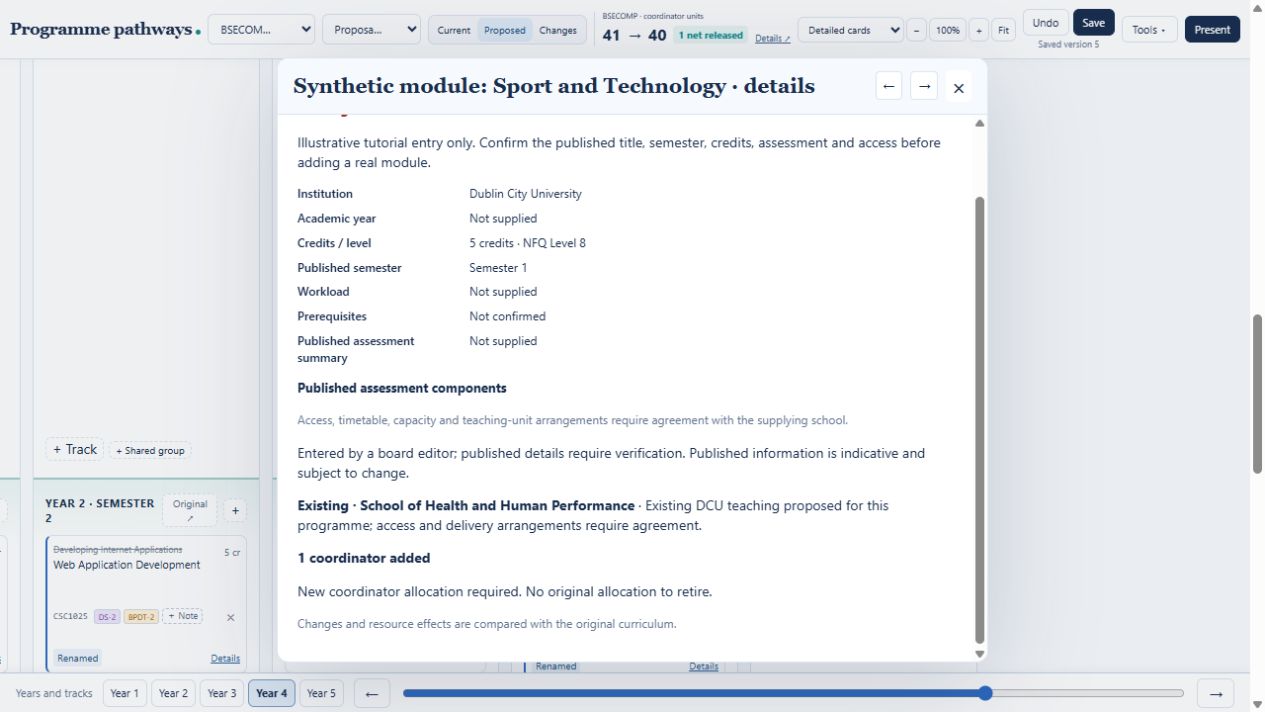
Add the module. It receives a thick dashed red border and an i information button. Use unit starts enabled; change it when the teaching arrangement is agreed.
Synthetic example. The source type applies to any DCU school, including Health and Human Performance.
Open i or Details to read the source information. Missing details remain unconfirmed. Editor-entered information is labelled as requiring verification.
Source facts remain attached when a card leaves an optional or shared group.
A proposed placement does not establish access, capacity, academic approval or timetable compatibility. Preserve the published credit value and NFQ level. An external master’s module keeps both a red source border and a black qualification outline.
04
Edit once, update linked uses
Select the module title to open its editor.
Change the linked title, notes or credits, then select Apply. The proposal’s other linked occurrences update with it.
If this occurrence needs independent academic content, use the editor’s detachment option before editing. An Independent copy label identifies the detached occurrence.
To use a different module, select Replace module and choose an existing catalogue entry, or create a new module.
Linked content and teaching allocations are separate. Detaching editing does not automatically create another lecturer allocation. Review Coordinator allocation and Use unit explicitly.
Programme and pathway name editors update the shared proposal labels across views. The original curriculum and other proposals retain their reference labels.
05
Shared groups and optional groups
Select + Shared group within a semester. Choose the participating tracks and modules, including each selected module’s source track.
Give the group a short descriptive name. Use the group’s edit control to change its name or colour.
For alternatives, use + Optional group in the relevant track or inside the shared group. Set how many modules students choose, then add the candidates.
Select the required options. The credits count the selected combination; teaching units represent the modules offered.
Drag a card out of an optional group to make it a normal placement in that track. Its obsolete optional flag is cleared, while its module identity and external-school source are retained. Dragging or detaching from a linked group is distinct from detaching the module’s editing identity.
Use a shared group’s delete control to remove its structure. Read the confirmation carefully, particularly when its modules are used by several tracks.
06
Semester routes and integrated master’s
A Semester route · choose one block switches a track between its taught curriculum and the full-semester alternative, such as Semester Abroad or INTRA. Use its radio buttons; the alternative replaces the taught semester for that track.
Years 1 and 2 use programme foundations. Specialisation and integrated routes begin in Year 3. The current integrated model retains 60 credits in Years 3 and 4, including 30 master’s credits across those years, and 60 in integrated Year 5.
Year 5 contains two 7.5-credit taught modules per semester and a 30-credit practicum. The Integrated versus Standalone choice controls whether earlier recognised modules are excluded or all 90 MSc credits are shown. Earlier recognised modules must not be taken twice.
These are proposal rules, subject to academic approval and prerequisites. Read the displayed totals after changing modules, options or routes. Additional external Level 9 options do not automatically change the four-module recognition agreement.
07
Check credits and teaching units separately
Credits. Student workload for the selected pathway. Optional choices and semester routes affect these totals.
Teaching units. Coordinator allocations for offered teaching. A shared delivery is counted once across its users.
Use unit. Enable when a module needs a computing allocation; disable when its delivery is covered elsewhere. New and external-school modules default to enabled.
INTRA and non-contributing modules. Their exemption rules are independent of the credit value.
Open Details ↗ in the top resource summary for gross units released, units added and programme totals. A net reduction can conceal both releases and additions; review the separate figures.
08
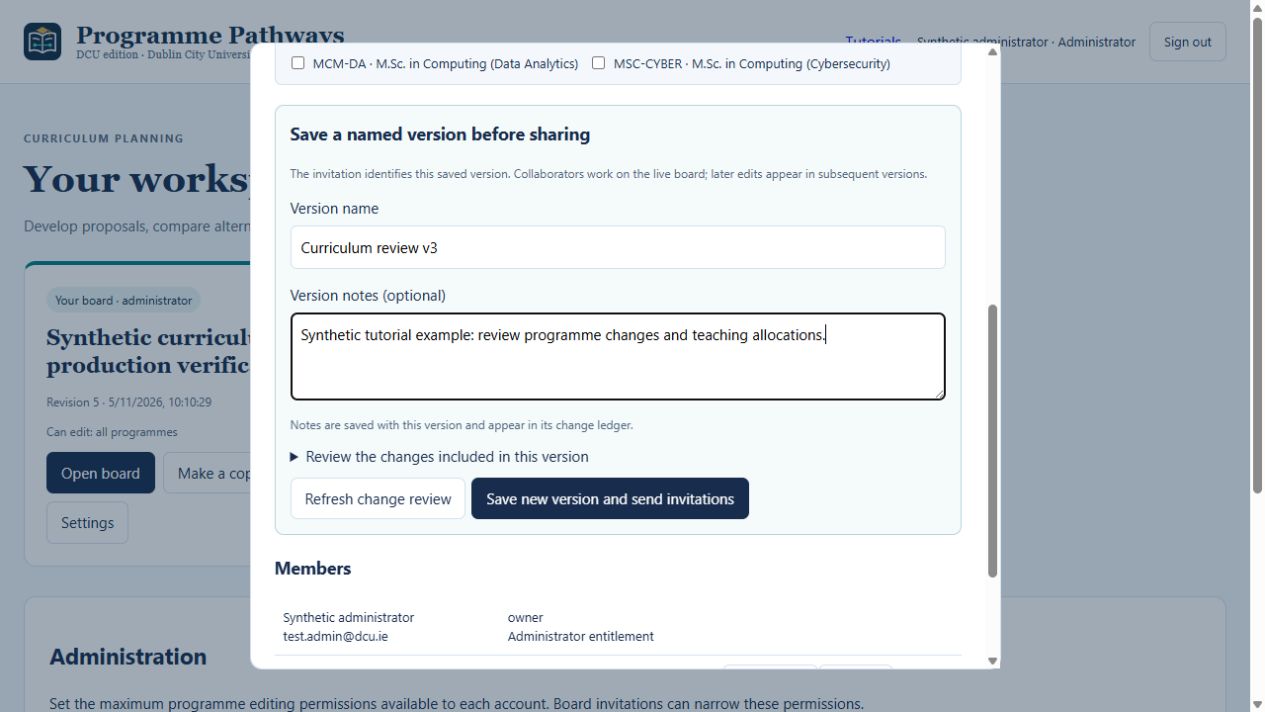
Save a named version, add notes and revisit history
Edits to a shared board are saved automatically. Check that the header confirms they are saved.
Select Save named version or Save to create a review point. The suggested name continues the previous name with v2, v3 and so on; you may edit it.
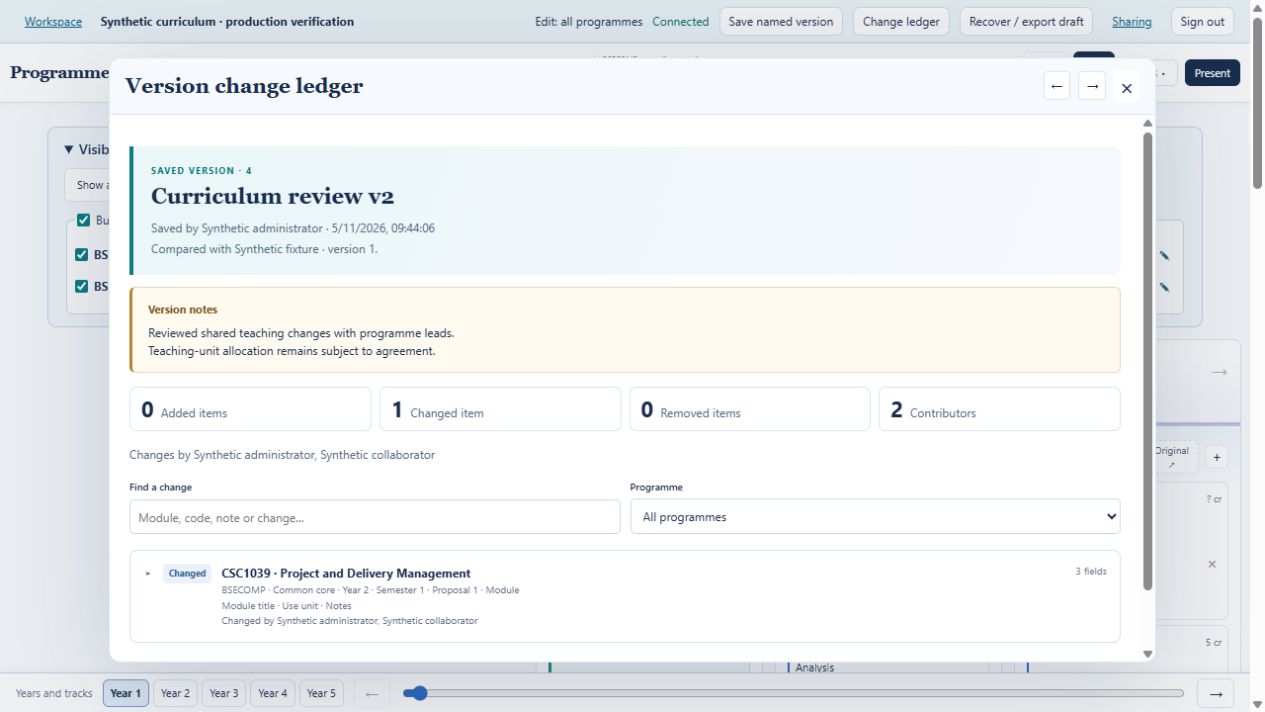
Add optional Version notes for decisions, assumptions or issues to review. They belong to the version and appear with its changes.
Open Change ledger for before/after values, contributors and the edit trail. The person saving the version is distinguished from the authors of its individual edits.
Open Tools → History to review earlier versions, compare selected fields, export or restore. Restore creates a new version and retains the history. Use Back to return from a ledger or comparison.
A named version collects its intervening edits. The ledger identifies the actual contributors.09
Share a board with several colleagues
From the board, select Sharing, or use the board’s Sharing button in the workspace. Resolve any pending draft first.
Enter up to 25 DCU email addresses, one per line. For a personal greeting, enter Alex Example <alex@dcu.ie>. Existing account names take precedence.
Select Viewer or Editor. For editors, select the programmes they can edit. Every recipient in the batch receives the same selected access.
Review the changes, version name and optional notes, then select Save new version and send invitations.
Recipients receive the named version, sharer and date/time, a change-ledger link, and instructions to sign in with Google using the invited DCU address.
One review point is saved before the invitations are queued. The whole batch is rejected if a recipient fails validation.
Invitations expire after seven days. Check their delivery state in Sharing. Queued means awaiting the mail worker; it does not establish delivery. Revoke an outstanding invitation there if needed.
Collaborators edit the live board. The emailed named version remains a preserved reference. To explore separately, use Make a copy and select the saved version from which to start.
10
Concurrent changes and draft recovery
Compatible edits can merge. When two people change the same field, the app retains your draft and asks you to review the conflict against the latest board. It does not silently replace the other person’s change.
Keep the tab open if saving fails.
Use Recover / export draft to download a recovery copy, load your pending changes or compare them with the latest board.
Resolve the displayed fields, then save. Discard only when you intend to abandon that pending draft.
A recovery draft belongs to your signed-in account, board and browser tab. It is separate from saved versions. The workspace recovery panel shows drafts for your account only.
11
Views, calendar and camera-ready exports
All views use the same proposal. Change names or linked module details once and inspect the updated cards, pathways or streams view.
For room planning, choose Teaching calendar, the semester and one or more programmes. Inspect module names, attendance by programme, combined capacity requirements and conflicts.
Recorded timetable sessions are evidence of scheduled teaching. Missing sessions do not prove that no teaching occurs. Capacity and cohort inputs remain provisional until confirmed.
For a slide or report, use Tools → Download full board PDF. In the card views, choose landscape or portrait, separate semester pages and the desired year rows. Use Fill page width and centre the content and an optional full-page overview.
The pathway overview has a presentation export that removes editing controls. Image export captures off-screen board content; PDF retains sharp text.
The visible-track selection affects exported columns. Review the exported file before stakeholder circulation, particularly long titles, year-long modules, route selections and credit warnings.
12
Permissions and institutional settings
Global administrators approve DCU accounts, set their maximum programme editing permissions and suspend access. Board owners manage sharing within that ceiling. Editors make permitted programme changes. Viewers inspect the board.
An editor invitation cannot grant programme rights that the administrator has not already approved. Ask the administrator to approve a new editor account and the relevant programmes before sending an editor invitation.
The logo is an original Programme Pathways mark. “DCU edition” identifies this deployment; it does not assert approval of the proposal or use of an official university crest. Presentation branding can be configured for later deployments separately from the enforced DCU authentication policy.
No matching tutorial. Try a module code, “sharing”, “units” or “PDF”.